[PHOTO NOTES: I’ve saved images very large so you can click on them to see the details close up. It’s important that you understand the textures of the cast iron during the shopping and restoration process. If you want to use these photos, please contact me. Thanks, Julia]
 For a while now, I’ve been wanting to add a couple cast iron pans to my kitchen for 3 reasons:
- the unique cooking abilities they provide
- additional iron my my diet
- and nostalgia because they’re what my grandma used
But I just wasn’t finding any in the Goodwill stores I frequented, on Craig’s list or Freecycle. Then one day, @snappyjdog tweeted that she scored a vintage pan at a local antique store and that they had more! Oh groovy groovy groovy! So I did my Google research into old cast iron brands to make sure I knew what I was looking for and headed over to buy my first cast iron skillet. Yes, I was 47 before adding cast iron to my kitchen.
Then you’ll never guess what happened! My SIL sent me two more cast iron skillets she had lying around unused. So now I have a great set of skillets in three different sizes! I am sooo stoked!
TIP on buying old skillets: Sometimes old cast iron develops cracks, usually as a result of abuse. You won’t likely be able to see any crack due to the accumulation of seasoning so the only way to test is by sound. Dangle the skillet by the handle and rap it with your knuckle. It will either ting like a bell or sound dead with a slight buzz. Guess which has the crack?
Now I had to decide what to do next.
After reading up on old pans, I quickly realized I had to first restore this pan then start the seasoning process all over because I did not know the history of the pan. For all the antique dealer or I knew, it coulda been used as a drip pan under a car in someone’s garage. No way to know for sure.

So what comes next is not necessarily environmentally friendly but I figured since I’m only doing a couple of pans I wouldn’t beat myself up over it. But I’d recommend that if you’re going to be in the habit of restoring a lot of cast iron, you should come up with a more environmentally friendly and safer method than this. There are a lot of folks who swear by burning off the old seasoning (there are others who say that’s a bad idea) and there are other cleaning products like Simple Green® (although I have no idea if it works) but I couldn’t find any of them in my area so I went with Easy-Off® oven cleaner.
Materials you’ll need to restore and re-season an old cast iron pan:
- the pan
- Easy-Off® oven cleaner
- plastic garbage bag
- rubber gloves
- scouring brush
- scouring pad
- dish soap
- Crisco® shortening (which is vegan BTW, not healthy but no longer animal based)
- lots of paper towels or old rags
- a NON-silicone oven mitt or pot holder, something with friction like terry cloth
And for future cleanings after cooking:
- salt
- a towel that you don’t mind looking grungy all the time
Steps to restore your new old pan:
- Spread the garbage bag in an area where it can stay undisturbed for a few days, this will take a while. I spread it inside an old cheap plastic bath tub in the spare bathroom because that room is cool (less evaporation), no one ever goes in there and I can close the door to keep fumes contained.
- Put on those rubber gloves.
- We’ll do the inside of the pan first so place the pan facing up on the bag and spray heavily with Easy-Off. Try not to inhale the fumes, do this quickly and get out. Wear a mask if you’re sensitive to fumes and watch the over-spray so that it doesn’t get on anything in the surrounding area.
- Come back in 8 hours and spray another layer of Easy-Off on the pan. Same deal, do it quickly and get out. Close the door behind you. NOTE: I tested doing this outside and the squirrels got too curious and I didn’t want to hurt them so I moved it to the spare bathroom. I also tried washing off the goo after 8 hours and while a lot came off, it did better after sitting 24 hours and reapplying the Easy-Off 1 or 2 times in that time period.
- When time is up, put the rubber gloves on again and cautiously rinse off the crud then use dish soap and a plastic brush to scrub at the loose bits. Be careful of splashing the crud everywhere.
- Dry thoroughly and repeat as often as needed to get all the old seasoning off the pan. Once one side is done, you can do the other side by flipping over the pan on the garbage bag. Some folks do the whole pan at once and put it inside a plastic bag. I was looking for a photo opp so I did it more slowly.
- Once all the crud is gone, wash the pan really well in hot water and dish soap to get all the Easy-Off off and dry thoroughly.
A note about rust. Easy-Off will not rust the pan. It may look like it’s immediately making rust when you spray it on but on my pan, that was the crud starting to loosen and there was some old rust on the pan that the Easy-Off removed as well.

Steps for seasoning your freshly restored pan:
- Line the bottom rack of your oven with either foil or a baking sheet that is large enough to catch any drips from the skillet.
- Preheat the oven to 125 F before placing skillet inside so any moisture in the oven’s air is eliminated. This prevents any light rust from occurring on the surface of the skillet.
- Then add the dry skillet to the 125 F oven for 15 minutes to warm it up.
- Remove the skillet and coat with Crisco then wipe off as much Crisco as possible. Coat the handle, the inside and the outside of the skillet.
- Using a non-silicone oven mitt or pot holder (otherwise the pan will slip from your grib and make a mess on the floor) return the skillet to the oven, upside down on the rack above the foil/baking sheet and turn up the temperature to 350 F. You want the skillet to be face down so that excess oil drips off and doesn’t pool inside.
- Bake at 350 F for 1 hour. Turn off the oven and let the skillet cool completely while in the oven. (There are a lot of different opinions on temperature and length. Some sites say 2 hours at higher temperatures like 350 F, some say 1/2 hour at 225 F. I’m going to try the lower temperature and shorter time with my second pan to see if there’s a difference. But whatever you do, let it cool completely in the oven before removing.)
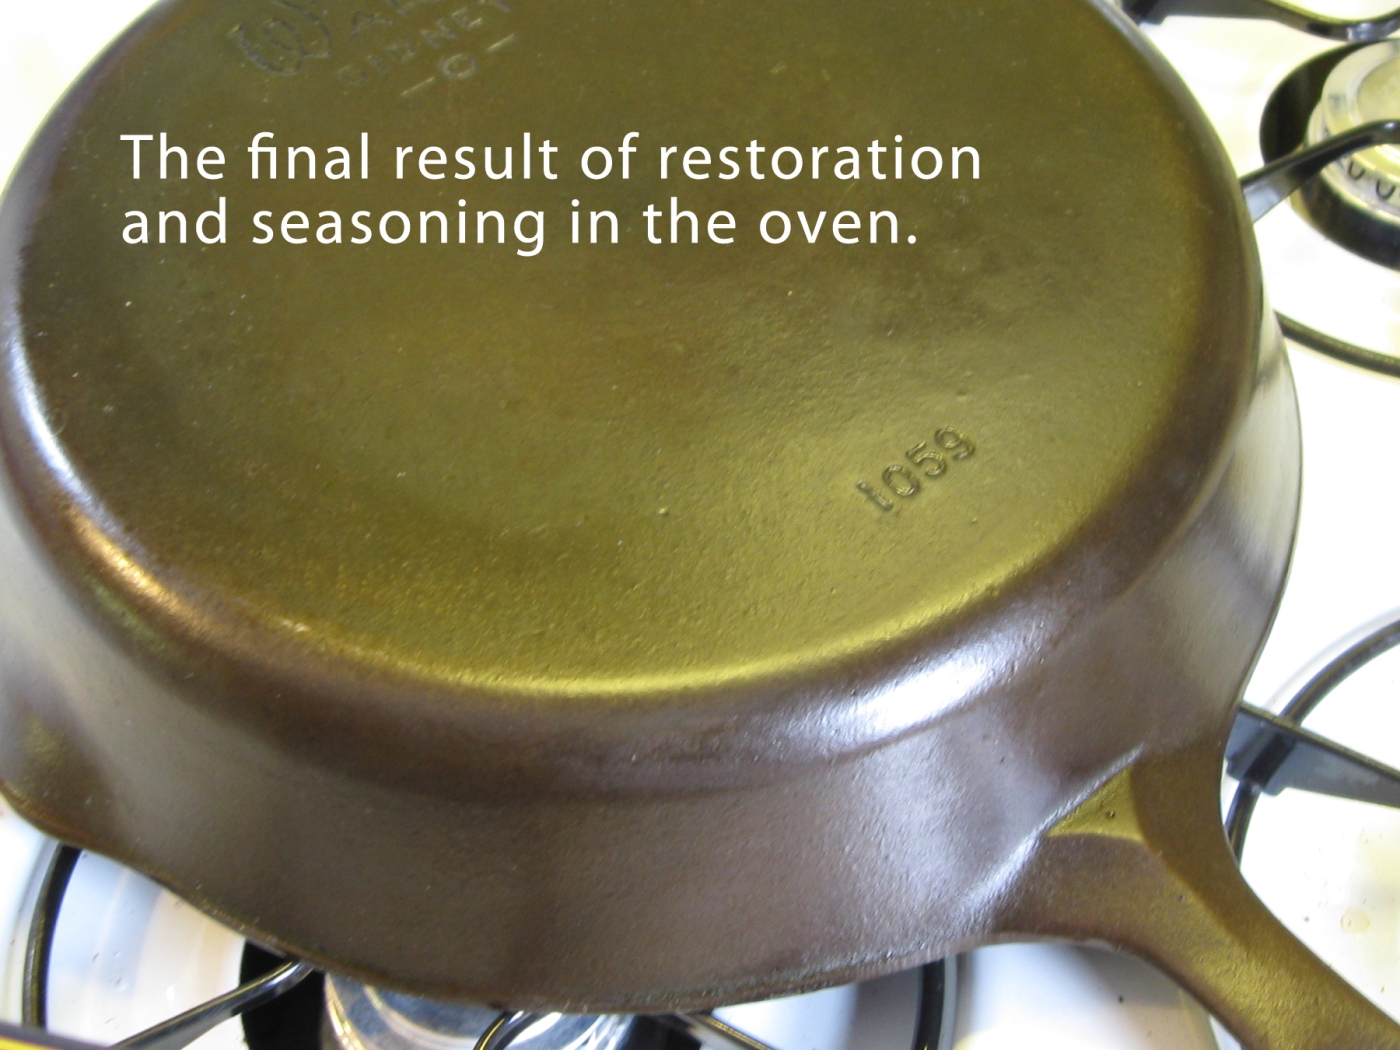
- After the oven and skillet are completely cooled, remove the skillet and wipe again to remove excess oil. Your skillet now has its first layer of seasoning!
What’s happening during the seasoning process: Heat opens up the pores of the iron, allowing the fat to enter. Cooling closes the pores, leaving you with nature’s best non-stick surface. The surface is now also rust-resistant so long as you don’t soak your pans in dish water. If you’re a soaker kinda person, cast iron is not for you.
Note about Crisco® shortening: While Crisco is now vegan, it’s still not as healthy as olive or canola oil. I have read a lot of websites that use oil for seasoning and those that adhere to the tried and true Crisco. I haven’t tested each fat to see if there’s a difference in seasoning quality because that would involve having two identical skillets to test, which I don’t. The sites that suggest using Crisco do so because they feel it provides as superior non-stick surface, so that’s what I used. But if you try it with oil, please let me know how it worked for you.
So how to clean cast iron after cooking with it?
- First, you have to get over the ick factor of not using dish soap. Remember, dish soap really only softens the water. It doesn’t actually have any antibacterial or sterilizing properties.
- Then, you’re going to assign a towel or two to be your cast iron towels. These towels are going to get dirty when you use them because your cast iron will always leave smudges on towels when you’re drying it. You could also use paper towels.
- After cooking, you’ll simply wipe the skillet clean using salt as a scrubbing helper to get crusty bits off. If needed, use a plastic scrubber pad. Avoid metal scrubbers at this point because they can scratch the seasoning. If your skillet is truly encrusted with food, I’ve read that you can boil water in the skillet to loosen the bits but I’ve also read that you should NEVER boil water in cast iron because it will rust. So I’m still looking for a good solution to cleaning heavily encrusted skillets. Cast iron is best used with some sort of fat to keep the seasoning going and prevent rust. If you’re boiling noodles, don’t use cast iron.
- Store your cast iron pieces with a towel or paper towel between them. In some household environments, they can collect condensation when touching which can encourage rust.
Stuff you should buy:
- Buy or make padded handle hotpads since a cast iron skillet’s handle gets hot. And keep them on the pan when using so you don’t accidentally burn yourself. Of course, you’ll remove handle covers if baking in your pan but I’m going to assume you know that already ;-P
- A good place to store cast iron is directly on the stove top or in the oven so it gets used and doesn’t collect dust. If your pan becomes dusty from non-use, a quick wipe with a damp rag will remove the dust. Just remember to NEVER let your cast iron spend ANY time soaking in water.
Benefits of cooking with cast iron:
Oh man, where to start? There are so many reasons to use cast iron, we could write a book. But it really boils down to two key benefits:
Superior cooking: There’s nothing like a heavy cast iron pan to give your corn bread that perfectly browned crust. It heats fairly evenly, retains heat really well and develops a safer non-stick surface than those chemical surfaces that shan’t be named. You can use it at higher temperatures than Teflon® surfaced pans and it won’t burn. Just as with a wok, you really can’t kill your cast iron skillet unless you took a blow torch to it, dropped it from a significant height or ran over it with your car. Even if you found your husband used it as a drip pan under his Harley, you can salvage this pan.
Nutrition: Take a look at these quick numbers for some of my favorite foods.
| Foods Tested (3 oz.) |
Iron content, raw |
Iron content after cooking in cast iron skillet |
|---|---|---|
| Applesauce, unsweetened | 0.35 mg | 7.38 mg |
| Spaghetti sauce | 0.61 | 5.77 |
| Medium white sauce | 0.22 | 3.30 |
| Pancakes | 0.63 | 1.31 |
In 1986, the Journal of American Dietetic Association‘s 1986 conducted an extensive test of the affects of cast iron on some of the foods we eat. Read this awesome page to learn more about how this test was conducted and see a longer list of tested food items.
Iron absorption by cooked foods depends on:
- the acidity and moisture levels of the foods
- the age of the cast iron (I wonder if this is more about the age of the seasoning than the age of the actual iron ore)
- the length of cooking time
- the amount of stirring
For folks like me who have always been borderline anemic, this is a health boon. You also don’t have to use as much fat as with other pans while cooking because its well-seasoned surface becomes a good non-stick surface.
Obviously, if you have issues with iron toxicity, cast iron cooking is not for you.
Brands to look for when shopping:
There actually are books written on this topic. One of the best experts in the field is The Pan Man. This guy IS…The Man. He’s the expert. There are others who know an awful lot though including Black Iron Dude. Here’s a brief run down of the primary cast iron cookware brands:
Griswold: This is the Rolls Royce of cast iron cookware, if you can find an authentic piece and not a reproduction or fake. These go for HUGE bucks on eBay and Craig’s List but you’d find better deals at estate sales, garage sales or perhaps antique shops. If you Google “Griswold cast iron”, you’ll find a ton of background info such as what the logo looks like at various stages in the company’s lifespan and that Griswold was eventually bought by a competitor, Wagner. True Griswolds are no longer made and newer cast iron is not made the same way as the stuff your great grandma used. The older iron was reportedly of a different ore, was lighter in weight and thinner than today’s models, and was hand worked after casting to create a VERY smooth cooking surface. Do your research before shopping so you can better identify the age of any Griswolds you run into. More than likely you’ll run into Griswolds made between 1897 and 1957 but the older “Erie” pans from 1865 to 1909 are reportedly some of the best.
Wagner Ware: Wagner was a competitor of Griswold in the 1800s through the early part of the 1900s and made a very fine product. In fact, you’ll find that there are basically two camps of cast iron aficionados: Griswoldites and Wagner Warers. IMHO, it has as much to do with the individuality of the pan since they were all hand made and the seasoning. From my not-very-in-depth research, Wagner Ware seems to be available for less than Griswold. Incidentally, you may run into pans that are stamped with both Wagner and Griswold trademarks. Collectors don’t really care for these pans as they were made after Wagner bought Griswold. Likewise, if a Griswold pan contains the cross logo WITHOUT the “Erie” imprint, it was also made by Wagner.
Lodge: Another very old American company, Lodge reportedly made great products for years but it seems to me they’ve stopped with the individual handwork on the cooking surfaces of pans. The current Lodge pans you’ll find in stores have a rougher texture and are likely to be part of their Lodge Logic line that is pre-seasoned. The pre-seasoning can be removed using the same restoration process I’ve outlined above if you prefer to create your own surface.
Unmarked pans: Even Griswold made a number of unmarked pans so if you see one, check its weight and surface quality before deciding against it. It could be anything if unmarked but if it’s smooth rather than bumpy, finely made, thinner walls, it may be an older model that will be a wonderful addition to your kitchen.
Spotting old versus new pans.
Here are some photo close ups to show you what to look for when perusing antique stores. I left the main images insanely huge so you can see the different textures, just click on the photo to enlarge full size.


There are other brands but Griswold, Wagner Ware and Lodge are the big 3 that keep coming up in Google searches. And we haven’t even thought about discussing enamel cast iron like Le Creuset — a whole other category for sure.
So go shopping, keep your eyes peeled, don’t forget to check for cracks and you could make a tidy side business out of reselling antique cast iron to chefs who are always on the lookout for the good stuff.


December 5, 2010 at 2:55 pm
Thanks, Julia, this was so interesting. A bf who loved cooking raved about cast iron skillets, but I had no idea how they were seasoned. In fact, I thought it meant like adding spices for residual flavor. Seriously. P.S. Ima guess that skillets without cracks ting like a bell. This same trick, which my mom taught me, works to tell if something is glass or crystal–crystal tings.
December 5, 2010 at 3:01 pm
Really? That works for glass vs crystal? I guess I don’t really know what crystal is then ;-P I thought it was glass!
December 5, 2010 at 3:03 pm
P.S. Have you ever worked as a technical writer? You would be very good at it, but I don’t recommend it as a career, lol.
December 5, 2010 at 3:06 pm
Crystal is glass but with a higher amount of lead, which makes it fancy pants & expensive.
December 5, 2010 at 3:29 pm
Monica,
Thanks but no thanks. I’ve known a lot of technical writers and they have a tough go of it. Nobody seems to appreciate them as much as their fiction counterparts. Then again, nobody appreciates marketers either ;-P
Glad I don’t have a desire for crystal. Sounds unhealthy and expensive.
December 5, 2010 at 4:01 pm
Very informative! We do rinse our cast iron pot out but now that I read this I am seeing it might not be the best idea. I am passing this on to my husband who is the cast iron geek in the family. And the only one who can lift the pot and lid. Why do they have to weigh so much?
December 5, 2010 at 4:10 pm
Bitt,
I freaked a little when I kept reading about not washing the pans in water. I found that just wiping them was referenced more times than washing in soapy water. ALTHOUGH, The Pan Man says to put hot water in the pans (not cold water), then boil them to clean. I don’t know. I think we’re going to just have to experiment a little. I’d love to know your husband’s thoughts on this.
The older ones are actually a little lighter than the newer pans. I picked up two skillets of the same size that the antique store and one was about twice as heavy as the other. From what I’ve read, IN GENERAL, you can assume that lighter weight pans are older. But I wouldn’t hang a hat on that.
December 5, 2010 at 4:32 pm
Great article! I may have to give my much-loved cast iron skillets a face lift. In the past I’ve started the seasoning process using liquid oil and it gets gunky like tar pitch if the skillet isn’t used right away. Crisco, that good old kitchen standby, comes to the rescue again!
December 5, 2010 at 5:40 pm
Plus you gotta bake it on that first time. THEN it’s like a glassy surface, no gunk. Of course, you need to remove all the old stuff first if you want to restore it.
December 5, 2010 at 7:11 pm
I do love cast iron. Cornbread made in a skillet just seems to taste better.
The easiest way to clean the crud off an old cast iron skillet? Use a sand blaster. Most people don’t have access to one, but it makes short work of it.
December 6, 2010 at 1:00 am
Charles,
My grandma always made her cornbread in cast iron skillets so I’m anxious to try a batch that way. She always made cornbread pancakes, no sugar. They were totally different than the cornbread we got in the lunch line in school.
January 3, 2011 at 10:00 am
Wow. Great post. Very detailed with lots of information! I have a cast iron pan waiting to be born again. Thanks for the inspiration.
April 2, 2011 at 9:39 pm
I am in the midst of completing step one, but am finding that there’s what appears to be a thin layer of rust on the inside of the pan. Any extra step to take or just keep using easy off until it’s all gone?
April 2, 2011 at 10:25 pm
Erin,
One of mine had some rusty areas too but the Easy-Off took it out with several treatments. I think it will depend on how deep the rust is on your pan. If that doesn’t do it, try scouring with salt and oil, then if THAT doesn’t do it, try scouring with steel wool would be my recommendation. Let me know what happens eh?
thanks!
September 2, 2011 at 12:00 pm
Hot water and LIME JUICE is all it takes – no harsh cleansers needed! I made this discovery last night. I just restored a huge and horribly rusted, funky cast iron pot that had about 1/8 inch of rusted powder and disgusting unidentifiable metal deposits inside of it. It had been sitting in an old garage for many, many years and it was in terrible shape. First, I scrubbed off the loose crud with regular dish soap and a scrubbie pad. It took about 20 minutes. After the first scrubbing, I could finally see what I was dealing with. There was a lot of built up layers of grainy rust and thick deposits all along the inside that I knew I could not budge. I put the pot on the stove, filled it almost to the top with a couple of gallons of water, then added 20 oz of pure lime juice. I covered it with a frying pan lid that just happened to fit and heated it up to a simmer for about 5 minutes, turned off the heat and let it cool for about 30 minutes, leaving the lid on. When I poured out the water and lime solution, it had taken off 99% of the crud, right down to the lovely, deep silver cast iron. I used steel wool and dish soap to scrub off the few clinging deposits within five minutes. To finish up the rest, I used pure lime juice and steel wool on the remaining inside rim and the whole outside of the pot. To complete the whole job took some elbow grease and a few hours, but it was worth it. After I got the whole thing down to the metal, I seasoned the pan in the oven just like it was brand new. I get my water from a well and I have a septic tank, so I’m especially careful about what I put down my kitchen sink. I was so relieved and happy that my lime juice experiment worked and I wouldn’t have to use poison in my kitchen, I thought you might like to try it out before you have to resort to harsh cleansers in the future. :) P.S. I wouldn’t leave the lime juice on for more than an hour, because based on what I saw last night, it might actually eat pits into the metal after too long. If in doubt, you could work in batches – let it soak for just 20 minutes at a time & scrub in between, to see how much gunk has come off. I know it sounds unbelievable, but it really worked that well!
September 2, 2011 at 1:44 pm
Ok, now THIS is friggin’ cool! I will definitely give this a shot with the next pan. I hate caustic chemicals. If anyone else tries this, please post photos somewhere.
September 9, 2011 at 11:41 am
Hello all, I really like this idea. I am going to give it a try. However, I have been reading up on “electrolysis”. This is using an electrical current to remove the corrosion from the pan. All you need is: Battery charger, jumper cables, Arm and Hammer Super Washing Soap, Dish drainer, Large plastic tub and a metal pan. From what I have read, it will take about 3 to 5 hours to do this. I am going to try this out this weekend with an old Grizwald waffel iron my wife and I picked up from Antique store. It has a lot of rust and build up on it. I will take pictures of my process and report back to let you know how it went.
September 9, 2011 at 1:37 pm
This sounds totally like something my DH would get into! Maybe the next time I get a grody pan to restore, I’ll hit him up for his jumper cables! Let me know if it works.
July 17, 2012 at 10:55 am
Please do give this a try and email and let me know how it worked. I am getting fustrated trying to restore some iron skillets to the days of their old glory. Following the advice in this article it still does not come out quite right and they certainly do not get close to the pictures of the restored items in the article. Then again my fiancee calls me anal but I only confess to being somewhat of a perfectionist at certain things and underline certain! Please do email me with your results because that sounds interesting and if you do please provide me instructions of what you did. I would like to try that. Email me at custexpser@aol.com subject line “restoring skillets” otherwise it may get deleted or go to junk mail.
Thanks
July 5, 2012 at 6:11 am
Good, info and I grew up with my mother and grand parents using iron skillets. Once the skillet is thoroughly cleaned I was under the impression that a little salt should be added to the oil to season the skillet or pan and or to reseason it. I had a lot of them but I only have one now and it is a newer skillet and it is now warped. (hate that) Well I am going back to the old school products and your information was helpful as it relates to restoring old/vintage iron cookware.
Please contact me regarding this Idea. I am impatient and thought about soaking them in Muric acid and water for a few hours in a bucket and taking them out, rinseing them and scrubing them if there is anything left to scrub. Then immediately putting them in the oven and cure them with oil on the bottom and oil and light salt on the inside. Please send me any comments to my Email with the subject line of “RESTORING IRON SKILLETS”
You will find me at Email: Custexpser@aol.com
Thank You good artical you wrote.
July 5, 2012 at 5:36 pm
I’ve never heard of using salt during the seasoning process after cleaning the iron down to it’s raw material. I did do a lot of research prior to doing my own pans and the ONLY reference I found to using salt was in relation to cleaning the skillet after cooking in it, instead of using soap and water.
I don’t know anything about Muric acid. You should probably do a little more research. But I would avoid using water during the initial restoration so that you don’t develop a rust problem.
July 7, 2012 at 3:00 pm
Well this was very good information. I am in the process of buying vintage iron pots and skillets. In the meantime the warped one that I have is sitting in water and muric acid. What the heck, I was going to throw it away anyway! I just desire to see if it will clean the skillet easily but I will not try to season it again, I just desire to see if the build-up on it will take it back down to the Iron. I will know when I get the other items. I will be back to let you know how well that worked.
July 7, 2012 at 3:07 pm
Thank you, I am so intriged and insterested in what will happen to my old skillet after sitting in the acid for three days. Rest assured for good or bad I will report back the results and try to remember how much acid I poured into the water that barely covers the skillet. :-)
July 13, 2012 at 8:50 am
Hello.I tried Easy Off on my pan and all the yucky stuff came off. I then seasoned it and it has a smooth glossy surface. Should I wash it now?
July 13, 2012 at 9:36 am
Well, I was going to reply but got and email message first. My idea about using murtic acid was a bust on an old warped skillet. At least I was smart enough to get some heavy duty rubber gloves because that is the only way to take it out of the acid water without burning your skin. I put it in a plastic storage container with only enough water to cover the skillet and left it for 3 days. I took it out and put it in a large bucket with water to get rid of the acid. Not only did this not get off the heavy grease and crud except in the middle on the top and bottom but it did not do what I expected which was to take the entire skillet back down to the iron. Now I have the problem of what to do with the acid water but I have an idea about that also! Ok, I give and now have a vintage Dutch Pot in a bag soaked in easy off and have sprayed it for the second time now. I think I will spray it one more time and let it set for a day before scrubing it. In case, I did not say it loud enough, MY IDEA WAS A BUST ON AN OLD SKILLET THAT WHAT WAS GOING IN THE TRASH ANYWAY! I will get back to you on the results of your method and if this really works right all praises to you. I am not telling you where the acid water is going
July 16, 2012 at 9:46 am
LOL! I wondered how you were going to dispose of the acid when you discovered it wouldn’t work ;-]
July 17, 2012 at 11:20 am
Pssst. . . If I gave you the answer to what I did with that acid, I would have to come and kill you. It is gone. Heck as much water as I loose out of my pool and hot tub you can just sit it out in the sun and watch it evaporate and then rinse the tub but that is not what I did. lol
July 16, 2012 at 9:45 am
The first couple times I used my pan after the initial seasoning, I only washed it with the salt method that’s described in several places on the Internet. I wanted to be sure that I didn’t damage the seasoning and cause the pan to rust. Now that my pan is well-used, I can wash it in soapy water so long as I immediately dry it thoroughly and NEVER let it sit in water. Also, never use plastic utensils like spatulas or spoons. My cast iron got so hot that it melted my spatula and I had to scrape it off the pan then do a mini seasoning in the area that I scraped. I now use a metal spatula and wooden spoons.
July 16, 2012 at 5:44 pm
You know I give up. . . I followed the orginal posters instructions exactly on a skillet that I intended to throw away anyway but I tried muritic acid first to no avail. It still had crude all over the skillet I could not get off unless I used a drill and wire brush I am sure. Then I have a Dutch oven that I followed the instructions to the tee except that I put oven spray on it for three full days with repeat sprays daily. Then I had to take it out and put it in water and surface rust immediately showed up after drying. I had to clean the surface rust off again and immediately season it with lord.
When I noticed that, I went back to old school which means to get the crude off with steel wool and oven cleaner, dry it and place it in the oven to get hot and dry it further and rub it down with lord and put it back in the oven. Even if you leave the crude on it looks a lot better. I did not do this with the dutch oven. I was also taught to lightly sprinkly salt in the oil. Prehaps the salt melts and put an additional glaze into the pan. Basically I have read a lot about restoring Iron cookware but I am going back to old school because that is what is worked when I was a kid. I do not think oven spray was used because no one ever let there skillets get that bad. I am just thinking here.
July 18, 2012 at 6:44 am
Well, I think I know what is wrong. I do not believe the instructions are exactly correct, I have a nice iron dutch oven. I got it cleaned alright but I think putting it in the oven on 350 degrees only cooked the crisco and I now have a nice golden colored Dutch oven with some build up around the edges. I am thinking to put it in the oven at a lot lower temp, for maybe a longer time, so you do not burn the crisco and come out with a golden colored item like I have would be better. The color is really nice but it is not right. I am starting all over and cleaning the pot again and if using crisco the temp will be a lot lower or I may use a heavy vegetable oil this time to season it. My only thought is the crisco was cooked onto the pot which is why it came out golden brown. Just my thoughts here any other thoughts would be appreciated.
August 9, 2012 at 10:53 am
Bought Wagner 10 1/2 inch skillet off ebay and seasoned as per your instructions. Skillet came out great, used your temps and times also used no-name lard that was beside Crisco on grocery shelf. Skillet came out golden brown, because of high temp, seems tougher than teflon. If skillet encrusted with food was wondering if a scrapper made out of bamboo would work to gently remove?? Note here: had newer Wagner skillet, above is it’s replacement, put in sink one day no thinking and put cold water in it and it immediately cracked, at this point it was scrape iron, had it 10-20 years. Thanks for your info on restoration of skillet, old cookware is so much better than cheap Asia made.
August 10, 2012 at 12:21 pm
David,
Thanks for your comment. I did have one of my skillets turn ever so slightly gold during the process but I also read online that it can do that while the oven is warming up if there is humidity in the air. Something about the way the humidity settles on the surface. It didn’t affect the way I use my skillets though. Overall, I was amazed at how hard and tough the surface was when finished.
I also had to try a few different ways of scrubbing the skillets after they were first used. I tried the dampened salt rub method but was not satisfied with it so I then used a plastic scrubber to remove cooked crusties. That worked really well but I did have to use a paper towel to very lightly oil the skillet when I was done as the plastic scrubber did remove some of the finish. But after 8 or 10 uses, the finish became more permanent and I don’t have to worry about that anymore. Watch the bottom side of the pans though, I noticed my burner grates did also create scratches in the finish on the outside bottom of the pans. But that’s all settled now with lots of use. I even wash the pans in hot soapy water now with no rusting, that’s how well they’ve seasoned with additional use. Even so, I would never leave them to soak. I also learned a lesson about plastic utensils: don’t. The cast iron melts plastic spatulas and spoons. Took me a while to realize that the black stuff on one pan was my spatula, melted. Didn’t have to refinish but did have a scraping/oiling job to do to fix that. Metal utensils (or wooden spoons) are best and even if they scratch, the oils in the food recover the surface.
Your bamboo scraper sounds like a very fine idea. I bet it will be very gentle to the surface. If you notice any rust after it dries due to the scraper, just dampen, rescrape, dry and oil quickly before it oxidizes. Just like you would with a steel wok.
Regarding the cracking of your hot pan when it encountered cold water, that can happen with the old pans too. So be careful. You can spot a cracked old pan in an antique store by how it sounds with you rap it with your knuckle. If it sounds bell clear, no crack. If it sounds fuzzy, there’s a crack somewhere. Cracks are not always visible.
The biggest issue I’ve read about with newer cheaper pans are hotspots and a rough surface that won’t allow a non-stick coating to build up. My older pans are now like glass, very smooth surface.
Have fun!
August 13, 2012 at 8:26 am
Thanks for reply !! On the scraper, been using my chinese bamboo spatula as scraper, this does work and does not melt, you can use sandpaper to reshape scraping edge to what one wants, straight, angled or sharp or dull. Can find bamboo spatula at chinese food store that sells cooking utensils.
David
August 30, 2012 at 8:42 am
Just wanted to say thanks for the info on cleaning and reseasoning cast iron pans. I recently moved into a home and found two pans in very back corner of garage left by previous owners I guess , no one had lived in the home for over a year.. Neither have any brand names on them. One is a no 14 and one is a no 5. Both have heat rings on the very outer edge. I went thru the process you provided and the 14 came out beautiful after 24 hrs. The 5 however is another story altogether. I am still spraying and scrubbing after 4 days but think today will be th day . Some one really used this one to hell and back!!!!! But that’s ok because I plan to take it down that road myself once it is ready. Thanks again for all the great info!
August 30, 2012 at 2:57 pm
Deborah, Yep, I had a pan like that once. One that took longer to clean than all the others. I’ve also heard horror stories of folks who use old cast iron pans as drip pans under leaky cars — can you imagine? It’s hard to guess what kind of lives these old pans could tell but worth every effort if you can get them clean. No way does a new pan compare to the old gems. Good luck!