Everyone’s been throwing around the term cloches lately in the gardenbloggertwitospere. And yes, it is a real word folks and nope, not one I’d heard of as a kid on grandma’s farm. After all, it is French in origin and my family was from Kentucky, the Southern part.
Make like you have a French accent if you want to freak out your uppity neighbors and pronounce it klōsh. While it does sound rather high-brow, cloches are actually very helpful for keeping off unexpected light frosts from tender seedlings when nighttime temps dip too far. This works well for peppers and tomatoes in late April or early May in zone 5 but you’re pushing it to use them earlier in Northern states. Don’t even attempt on basil though, keep your basil inside until later May as it’s a lot like me: hates chills.
Now before you get your whitey tighties in a bunch, I’m here to tell you there is a totally ugly yet serviceable approach that won’t get you confused with those snooty gardeners who eschew tomato cages from Wal-mart and the like. Yep. I have 2 perfect solutions for folks like you and me.
The Shopping Bag Cloche

Ha! This is brilliant even if I do say so myself! I’m sure I can’t be the first person to think of this but at 11:00 pm in my jammies, I was super happy I did. Saved me a lot of time and protected 3 tomato plants that otherwise woulda bit the dust.
Here’s what you need:
- 1 white or clear plastic grocery bag (you know, the ones we’re not supposed to use anymore?)
- 2 twigs from the compost pile or the yard that needs rakin’
- Nestle the bag over the plant.
- Poke 1 twig per bag handle into the dirt, at an angle works best or even wrap the bag’s handle around the twig a couple of rounds before poking the twig into the ground. This secures the bag so it doesn’t blow away.
Don’t make it air tight by piling dirt around the bottom, you do want SOME ventilation.
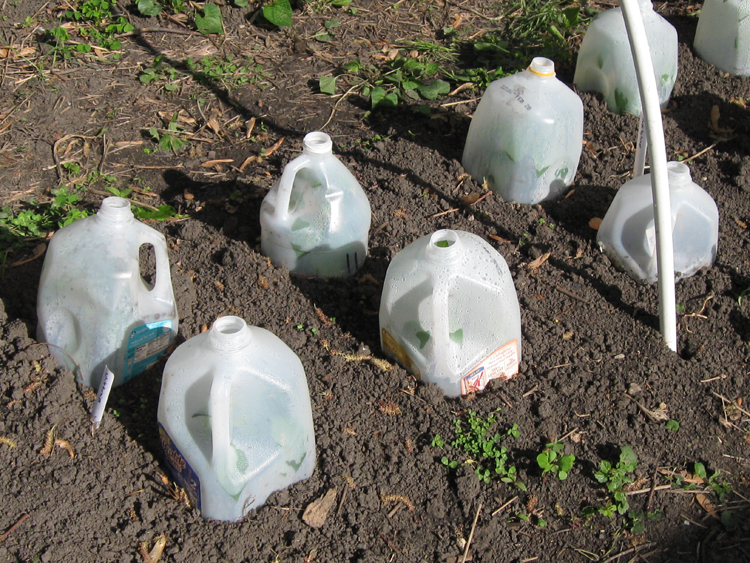
Recycled Plastic Jug Cloche

This one’s quite popular among urban gardeners I know in Chicago. You can use any jug from a 2-liter on up. I’ve used 2-liters and even gallon bleach jugs. Just make sure you wash it thoroughly so no ickies get on your lovelies.
Here’s what you need:
- 1 jug per plant, assign jugs to plants based on matching diameter and height
- scissors or a trusty knife
- Cut off the bottom of the jug so that only straight sides remain. If you leave any curves around the bottom edge, it’ll be a bitch to push into the dirt around your plant and you may get angry and accidentally decapitate something you’d rather not (NOT that I would know ANYTHING about that).
- Gently nestle the jug over your plant so you don’t pinch leaves under the edges and push the jug securely into the dirt. If you live in a windy area, you may have to push the jug deeper into the dirt.
- Be sure you DON’T leave the cap on the jug, it needs to ventilate during the day so you don’t end up with seedling soup for dinner.


Here’s a close up of how well one of my peppers is recovering under a jug. Yeah, I got it on a tad late but didn’t damage too many leaves yet.
Well, that’s it for today. Until tomorrow, remember all you purveyors of ugly gardens, I got yer backs.


May 9, 2010 at 6:22 pm
Yep, you betcha! Garbage bags here, too. No, I mean the big ones that the mail lady brings packages in when she has to set them on the front porch because they’re too big to put into the mailbox. Oh and they might possibly get sprayed by a stray cat or two, but stinky or not, they work. We ain’t fancy out here in God’s country.
Great post.
May 9, 2010 at 6:27 pm
My son says my pop bottle cloches make my garden look “space age”. They’re actually quite pretty with the condensation inside, sparkling through the WalMart tomato cages. The plastic bag thing is brilliant. If it rains, do the bags weigh down and damage the plants, though?
May 9, 2010 at 6:48 pm
Xan,
You have to take a photo of your space age pop bottles! I don’t drink a lot of pop so I’m stuck scavenging for bottles but I think it would be really cool to see a myriad of bottle types and colors.
I don’t know yet what would happen when it rains but will let you know. I would imagine that the water would roll off for the most part. You may notice in the photo that I also tied one bag to the chain-link fence as well as used the twigs to secure it. This is because that tomato was rather tall and I didn’t want the bag to pull it over and snap it off.
Kylee,
I wondered about garbage bags but since all mine are black, I didn’t want to use them due to possibly overheating the seedlings during the day. Although, I do have those short white bags for bathroom use, a tad bigger than grocery bags. They smell like vanilla ;-P
May 9, 2010 at 7:03 pm
I use the black ones sometimes, too. We have a pond liner that we’ve done nothing with yet, and that’s what’s over my tomatoes at the moment!
May 10, 2010 at 5:11 pm
What a crack up! You tell ’em sis!